Disclosure: As an Amazon Associate I earn from qualifying purchases. This page may contain affiliate links, which means I may receive a commission if you click a link and purchase something that I have recommended. There is no additional cost to you whatsoever.
Let’s make a journey down reminiscence lane to fifth grade science class. Besides getting a depraved kick of caffeine from that 2-liter bottle of Surge, these plastic bottles additionally made grade A supplies to reuse as seedling planters and twister hourglasses.
Are you prepared for a brand new undertaking? We’ve gathered collectively six tasks that reuse plastic bottles for ornamental, enjoyable, and sensible outcomes. Who knew you can reuse plastic bottles in so some ways? Ranging from an easy-to-make vase to an informative, kid-friendly science undertaking to a difficult, intricate lampshade, considered one of these tasks is bound to attraction to a DIYer you recognize!
Earth911 groups up with internet affiliate marketing companions to assist fund its Recycling Directory, the biggest within the nation, which is supplied to shoppers for gratis. If you buy an merchandise via one of many affiliate hyperlinks on this put up, we’ll obtain a small fee to assist assist this service.
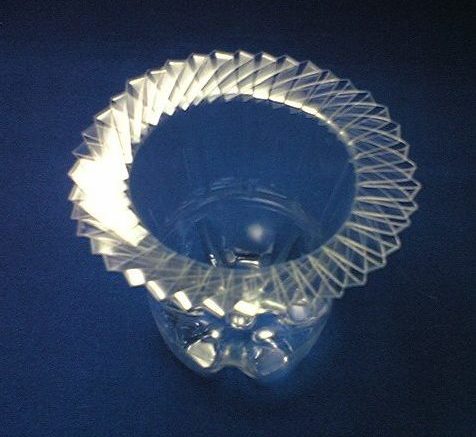
1. Woven plastic bottle vase
We begin out with a straightforward undertaking from wikiHow. Their step-by-step directions present you the way to reuse a plastic bottle to make a vase. From a distance, you’d by no means guess this vase was plastic. Plus, it’s just about unbreakable and you’ll recycle it should you determine to redecorate. You may additionally use it as a small bowl for holding spare change or odds and ends.

Difficulty stage: Beginner
What you’ll want: 20-ounce soda bottle, scissors, and a pencil for marking.
How to make it:
- Mark and minimize the sleek center portion of the bottle to offer a fair edge that’s roughly 7.5 to eight centimeters (round 3 inches) above desired place of fluted rim.
- Measure and mark straight, evenly spaced cuts all the best way across the bottle. Cut the segments in half; then minimize every of these in half to make even, skinny strips.
- Carefully press and fold all of the strips outward to make a stage edge all the best way round. Press the bottle the other way up on a flat floor to make sure a fair edge.
- Weave the tip of a strip over the following one and underneath the following two. Fold and crease it in order that the tip stays in place (see photos on WikiHow for a visible illustration. We promise it isn’t as laborious because it sounds).
- Fold and crease the following one the identical manner, however weave this one over two and underneath one. Fold the third strip and weave the identical as the primary one. Continue round on this sample till the final three and tuck each underneath the following till woven in fully.
Bonus tip: Add a contact of colour through the use of inexperienced soda bottles.
2. Plastic bottle lamp
We have seen loads of methods to make lamps out of plastic bottles, however that is by far probably the most plausible (and by that, we imply it doesn’t appear to be an Evian bottle with a light-weight bulb shoved into the highest).
This design by Popular Science reuses plastic bottles as a mildew for the lamp’s base. Using the “smart-looking shapes” of detergent bottles as inspiration, this retro design dates is paying homage to the Sixties.

Difficulty stage: Advanced
What you’ll want: plastic bottle, X-acto knife, drill, Vaseline, hollow threaded rod, hot glue gun, prescription medication bottle, Smooth-On 305, fine-grit sandpaper, flat washer, lock washer, nut, lamp cord, lamp shade of your selection, and a lamp socket.
How to make it: Popular Science outlines this undertaking in its 12-step photo guide. The complete factor will run you round 50 bucks.
Bonus suggestions:
- The ideally suited plastic bottle for this undertaking nonetheless retains its form after all of the liquid has been eliminated. So, don’t select one which’s skinny and flimsy.
- Look for bottles with minimal floor element. Before beginning the undertaking, peel off the label. You’ll discover you bottle could also be textured, however in line with the writer, this received’t assist together with your design.
3. Plastic bottle beads
For this undertaking, we’re actually supplying you with the supplies to make some much more rad designs — from jewellery creations to beaded door coverings.
The directions beneath come from Lindsay The Frugal Crafter. We discovered another cool suggestions and photographs on this Instructables tutorial on making a recycled plastic bead bracelet from Rhonda Chase Design.

Difficulty stage: Moderate
What you’ll want: plastic bottle, craft scissors, permanent markers, heat gun, and needle-nose pliers.
How to make it:
- Wash and minimize plastic bottles into strips which might be about 1 centimeter extensive.
- Color plastic strips with everlasting marker. (You may even add a drip of golden paint, you probably have it readily available.)
- Roll up plastic tightly with inked facet dealing with inwards. This could also be simpler should you wrap it round a toothpick or skewer. Secure the coiled plastic with pliers.
- Use warmth gun for about 20 seconds till the plastic shrinks and holds its form. Let it cool earlier than touching.
Bonus suggestions:
- If you don’t have a warmth gun, a hair dryer will work as nicely.
- If you don’t have a gentle hand to attract shapes in your beads together with your markers, don’t fear! Different coloured scribbles work nice. In truth, you may have your children assist with this step.
4. Soda bottle coin purse
If you take into account zippers a vogue assertion, this snazzy undertaking is for you. This design for a zippered soda bottle coin purse comes from WikiHow.
Difficulty stage: Moderate
What you’ll want: two plastic bottles of the identical dimension, zipper, nylon thread, scissors or craft blade, skinny needle, thick needle to punch holes, tape or stitching pins
How to make it:
- Select two plastic bottles which might be the identical form and dimension.
- Cut off the bottoms of two clear plastic bottles simply above the molded line. Then trim away any jagged edges with scissors.
- Use a thick needle or steel axe to punch holes about 1/2 inch aside alongside the minimize fringe of one bottle piece.
- Holding the zipper contained in the marked bottle piece, safe one facet of the zipper with tape or stitching pins.
- Sew the zipper to to the bottle piece utilizing the punched holes, eradicating the tape or pins as you sew.
- Open the zipper and stitch it to the within of the opposite bottle piece. Your coin purse is now able to be adorned.
Bonus suggestions:
- If the perimeters are nonetheless jagged after you’ve minimize your two items, use sandpaper or a nail file to clean the perimeters.
- When securing the zipper to the minimize bottle items, align the zipper tooth with the minimize edge of every piece.
- Be certain to take a look at WikiHow’s tips for decorating the coin purse.
5. DIY lava lamp
OK, we’ll admit that this design from Little Bins for Little Hands doesn’t have the zing that your outdated $40 lamp had, but it surely’s a enjoyable wet day undertaking. Science Bob presents extra data to show this undertaking right into a science experiment for the youngsters.

Difficulty stage: Beginner
What you’ll want: plastic water bottle, vegetable oil, funnel, water, food coloring, and Alka Seltzer (or generic model) tablets.
How to make it:
- Remove the label and wash your bottle.
- Using the funnel, pour vegetable oil into the bottle till it’s about two-thirds full.
- Fill the bottle the remainder of the best way with water.
- Add just a few drops of meals coloring.
- Break up the Alka Selzer (or generic equal) into items sufficiently small to suit via the bottle opening. Drop them into the bottle and watch the magic!
Bonus suggestions:
- Make certain your children observe what occurs if you add the water to the oil.
- Experiment with completely different sized bottles, colours, and the extent of oil in every “lava lamp.”
- If you don’t have Alka Seltzer, simply safe the cap to the bottle with glue or masking tape and let the youngsters see how the oil and water by no means combine.
6. Geometric lampshade
You’ve in all probability seen these lampshades round however could not have recognized you can also make your individual by reusing plastic bottles. This one begins out straightforward, however takes a bit extra mind energy to assemble, so be affected person; it’s well worth the effort! You can assemble the items in quite a lot of ultimate shapes. Find the complete directions in Instructables’ universal lamp shade polygon building kit.

Difficulty stage: Advanced
What you’ll want: Tracing design (get it here), PET (number one) plastic bottles, a light socket on a cord (strive Ikea), LED bulb (LEDs don’t get as scorching as incandescent or CFL bulbs in order that they received’t soften the plastic — plus, they final for much longer!)
How to make it:
- Trace your items and minimize them utilizing scissors or a knife. If you’re actually superior, you can even make a “cookie cutter” out of sheet steel within the form of the half. Then warmth the cutter and use it to stamp out the components. (Let us understand how that works out.)
- The meeting would be the hardest half. Instructables recommends simply becoming the components collectively first and experimenting to get the fitting geometric form. Be certain that the corners of every cutout match neatly collectively. Note that there actually isn’t a solution to make concave corners, solely convex corners.
- Cut slots into the corners of the items to allow them to neatly match collectively. Warning: This can get actually irritating, so don’t hand over!
Bonus suggestions:
- Make certain you employ the identical sort of plastic for your whole items. The variety of bottles you want relies on dimension of your lampshade.
- The stiffness of your plastic determines how giant your items may be — stiffer materials for bigger items and bigger lampshades, thinner materials for smaller items and smaller lampshades.
Feature picture courtesy of Instructables.
Editor’s observe: Originally printed on July 26, 2010, this text was up to date in February 2025.