Disclosure: As an Amazon Associate I earn from qualifying purchases. This page may contain affiliate links, which means I may receive a commission if you click a link and purchase something that I have recommended. There is no additional cost to you whatsoever.
Raised canine bowls can present health benefits to your canine and aesthetic advantages to your residence. There are a number of methods to construct a raised canine bowl with reusable and environmentally pleasant supplies. Reclaimed wood pallets are versatile and environmentally pleasant constructing supplies. Upcycling these pallets, as a substitute of shopping for virgin wooden, helps scale back the marketplace for extra timber harvesting.
Before you begin to construct your raised canine bowl, you’ll have to resolve which canine bowl you wish to use and the place you need your stand to be positioned. Pick a quiet nook in your house the place there isn’t busy foot visitors and your canine can eat peacefully.
This article incorporates affiliate hyperlinks. If you buy an merchandise by one among these hyperlinks, we obtain a small fee that helps fund our Recycling Directory.
Reclaimed Pallet Raised Dog Bowl
Dog coach and writer, John Woods from All Things Dogs created this straightforward and easy-to-follow design for a DIY raised canine bowl stand. To begin, discover a wood pallet that’s protected, and, ideally, free.
To discover free pallets, take a look at native shops, meals markets, DIY shops, or Craigslist. To be certain that your pallets are protected, examine their IPPC stamp; this can be a stamp branded onto the pallet that reveals a pallet treatment code. Make certain this code doesn’t include the letters MB (methyl bromide), which is poisonous to pets. Look for pallets with the codes DB (debarked and untreated) or KD (kiln-dried and untreated).
Once you may have sourced your pallet, let’s take a look at the supplies and instruments you’ll want.
Materials Required
- 2 reclaimed customary pallets
- 1 stainless-steel canine bowl (10” diameter)
- 1 pack of fifty x 1.5” oval nails
Tools Required
Instructions
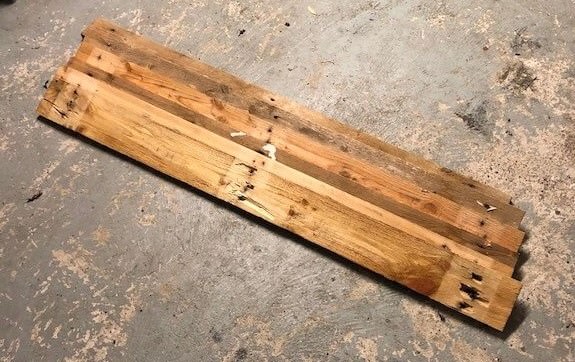
Break Down Your Pallets
Grab a hammer and begin dismantling the pallet’s base by eradicating the chocks. Pry the highest planks from the pallet utilizing your claw hammer. If any planks break, are rotten, or are in any other case unsuitable, place them apart. Once you may have eliminated the highest planks, pull out the nails and repeat this course of till you may have round 10 planks.

Prepare the Planks
In this instance, I’m utilizing a 10-inch diameter canine bowl, so I measured 14 inches alongside two of the six planks, drew reduce strains (utilizing a carpenter’s sq.), and reduce them to dimension utilizing a handsaw. Repeat this course of; nonetheless, this time use 13 inches because the measurement. Now, utilizing two off-cuts out of your pallet, reduce two 13-inch help beams. You ought to find yourself with six planks, two measuring 14 inches and 4 measuring 13 inches.

Build the Stand
Now that your planks are reduce to measure, you may construct the stand. Start by nailing the 13-inch width planks into the off-cut 13-inch help planks — this may double the width of the unique planks. Then nail the 14-inch size planks into the width planks to create a sq.. Once all the panels have been nailed collectively, you’ll have the bottom. Test to verify your bowl suits.

Fix Top Planks to Base
Using the remaining planks from the unique pallets, reduce 5 planks to measure 15 inches lengthy; this permits for a small overhang. Dry match the 5 planks to verify they’re degree and plumb after which nail every plank to the bottom. Finally, place your canine bowl the other way up on the completed prime, middle it, and draw across the bowl. Use this information to chop out the middle piece the place the bowl will match.

Once completed, you may sand, enhance, and clear your raised canine bowl stand, and your fortunate canine can eat dinner in a extra comfy place.
Feature picture courtesy of John Woods, All Things Dogs
About the Author
Editor of All Things Dogs, canine lover John Woods is a member of the Association of Professional Dog Trainers, acknowledged writer by the Dog Writers Association of America, and a dog-parent to 2 rescue canine.
This article was initially revealed on January 25, 2019.