Disclosure: As an Amazon Associate I earn from qualifying purchases. This page may contain affiliate links, which means I may receive a commission if you click a link and purchase something that I have recommended. There is no additional cost to you whatsoever.
Over 30 years as an equipment restore technician, one of many issues I see most continuously is a washer that gained’t spin. Fortunately, the reason for that is generally one thing easy which you could repair. In this text, I’ll stroll you thru the steps to get your washer draining like new once more, saving you money and time.
Why Your Washer Isn’t Draining
While on uncommon events, a damaged pump must be changed, most frequently the issue is a clogged drain. Water that hasn’t drained out is so heavy that it might severely injury the washer throughout spin. To stop this, water-level sensors in your washer gained’t let it progress to spin till all of the water has drained. So you’re caught with a bathtub filled with water.
The reason behind the clog is normally small objects within the laundry that obtained sucked into the drain, blocking the movement of water in the course of the drain/spin cycle. These are simply a number of the objects I’ve discovered clogging washer drains: panties, thongs, paper cash, metallic bra wires, tons of cash, hairpins, hair ties, rubber bands, and child socks.
It’s simple to forestall this downside with two easy steps:
- Always empty pockets earlier than washing.
- Put small clothes objects right into a zippered mesh bag to forestall them from being sucked into the drain.
Symptoms of a washer with a drain downside are:
- The cycle ends and the bathtub remains to be filled with water.
- Low buzzing sound from low within the washer attributable to a caught impeller when the washer is about for drain/spin.
- Clothes are nonetheless moist on the finish of the cycle.
- Error codes displaying on the show panel. Examples of drain error codes are OE, LD, and ND. (All these codes imply no drain.)
- The washer isn’t spinning when set to empty/spin.
This is a beginner-level challenge that ought to take about half-hour.
- Safety precautions: Unplug the washer earlier than you begin.
- Tools wanted:
- Small nut driver
- Flashlight
- Bucket
- Towel
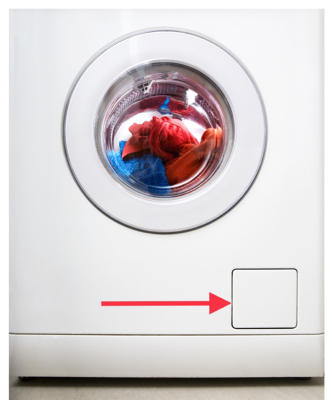
Step 1: Expose the Drain’s Coin Trap
Some washers have a small door within the decrease proper or left nook of the entrance panel with entry to the washer’s coin entice. Just hinge this door open to get to the coin entice. The coin entice is a plastic tray with holes in it that lets water go to the drain however catches cash and different small objects earlier than they’ll are available in contact with the drain impeller.

Other fashions of washers can have an oblong decrease panel that spans your complete width of the entrance panel beneath the washer door. For these fashions, use the nut driver to take away between 2 to 4 small screws beneath the decrease panel.
Pro Tip: To make it simpler to get to the screws securing the decrease panel, lean the washer again and put one thing round 2 inches thick like a block of two×4 wooden below the washer.
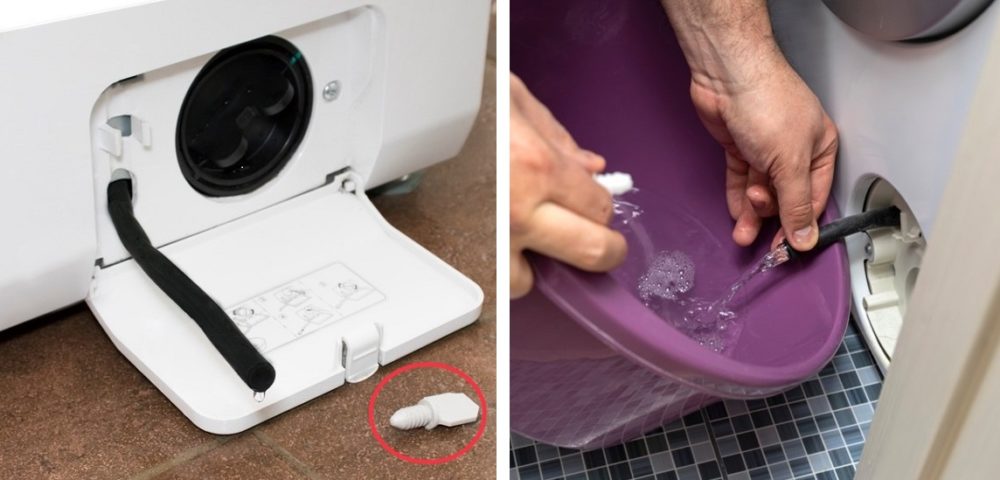
Step 2: Drain Out the Water
For most fashions, you possibly can comply with these steps to empty the water from the washer tub.
- Pull out the small tube subsequent to the coin entice and put it over the bucket.
- Remove the plastic stopper within the tube to let the water drain into the bucket.
- Put the stopper again in as soon as the bucket is close to full.
- Pour out the bucket into the sink.
- Repeat this course of till no extra water comes out. There’s most likely quite a lot of water so it might take many tries till all of the water is out.
Option B — in case your washer doesn’t have a small drain tube:
- Put a towel on the ground in entrance of the coin entice cowl.
- Place the bucket on the towel straight below the coin entice cowl.
- Slowly flip the coin entice plastic cowl counterclockwise till water slowly dribbles into the bucket.
- As the bucket will get near being full flip the coin entice cowl clockwise to tighten it and cease the movement of water.
- Repeat till no extra water comes out.
Option C — when you have a latest Whirlpool mannequin. Recent Whirlpool fashions don’t have entrance entry to the coin entice cowl. On these fashions, you entry the drain by eradicating the again panel. Follow these steps:
- Move the washer away from the wall by about two toes so you could have room to work.
- Remove all of the screws holding the again panel to the washer. Once you take away the again panel, you’ll see the coin entice cowl below the bathtub pointing towards the facet of the washer.
- A bucket gained’t match below the bathtub so you should utilize a frying pan or cookie sheet to seize the water.
- This sort of coin entice doesn’t have a small drain hose, so that you’ll have to slowly flip the coin entice cowl as defined in Option B to start out and cease the movement of water.
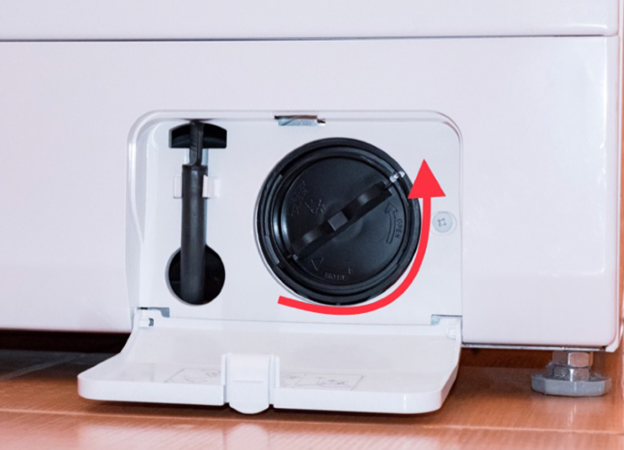
Step 3: Remove the Coin Trap Cover
Once you could have drained out all of the water, unscrew the coin entice cowl by turning it counterclockwise. (If you adopted Option B or Option C, you’ve already carried out this.)
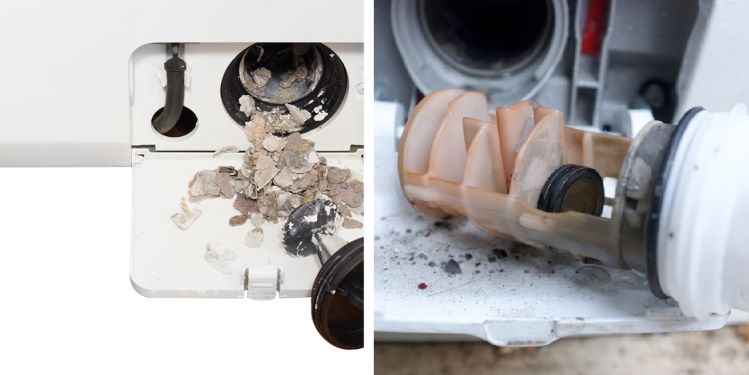
Step 4: Remove the Clog
- Pull the coin shelf in the direction of you and out of the drain. This might take some pressure if clothes objects are wedged into it.
- Look on the coin entice shelf to see what’s inflicting the clog and pull the objects out.
- Use your flashlight to look behind the place the coin entice sits contained in the drain meeting to examine for objects caught within the tube between the bathtub and the again of the coin entice. Remove any objects rigorously along with your fingers or needlenose pliers. Note: Go slowly as clogs within the tube could also be holding again extra water that can rush out when you take away the objects inflicting the clog.
Step 5: Reinstall the Coin Trap and Cover
- Wiggle the coin entice shelf again into the drain. conserving it horizontal.
- Tighten the coin entice cowl by turning clockwise till it gained’t flip anymore.
Step 6: Reinstall the Lower Cover
- Put the decrease panel again on and reinstall the screws. —
- For different fashions, reinstall the again cowl and screws.
Quick and Easy Video – How to Clear Your Washer’s Drain
Step 7: Test for Leaks
- Plug in your washer and begin a standard cycle. As it fills. look ahead to any indicators of a leak.
- If you see any water leaking from below your washer, press the cancel button to cease the water from filling and activate the drain. You’ll have to tighten the coin entice cowl to ensure there’s a good seal.
- If it passes the leak check, begin a spin cycle to check the drain.
Your washer ought to now drain rapidly and totally. You’ve saved time and cash and saved one other washer out of the landfills. (Note: If your washer nonetheless gained’t drain the water, then it’s time to name in a technician to exchange the drain pump. Either the drain motor is worn out or the impeller is damaged.)
Check out less difficult DIY appliance repairs from Scott the Fix-It Guy.